Animating Animatronics using Blockbench
The Animatronics purpose is to be positioned and animated. However, this can be difficult without additional help. But there are ways to make this process a lot easier!
This guide will provide the needed resources to get started animating the Animatronic using Blockbench
Using Blockbench
The easiest way to plan out positions and animations is by using the Animatronic.bbmodel file.
So first of, get the model here! And if Blockbench still is not installed, then now is the perfect moment for a visit to their download page!
Basics
Now that everything is downloaded - and hopefully installed as well: ... 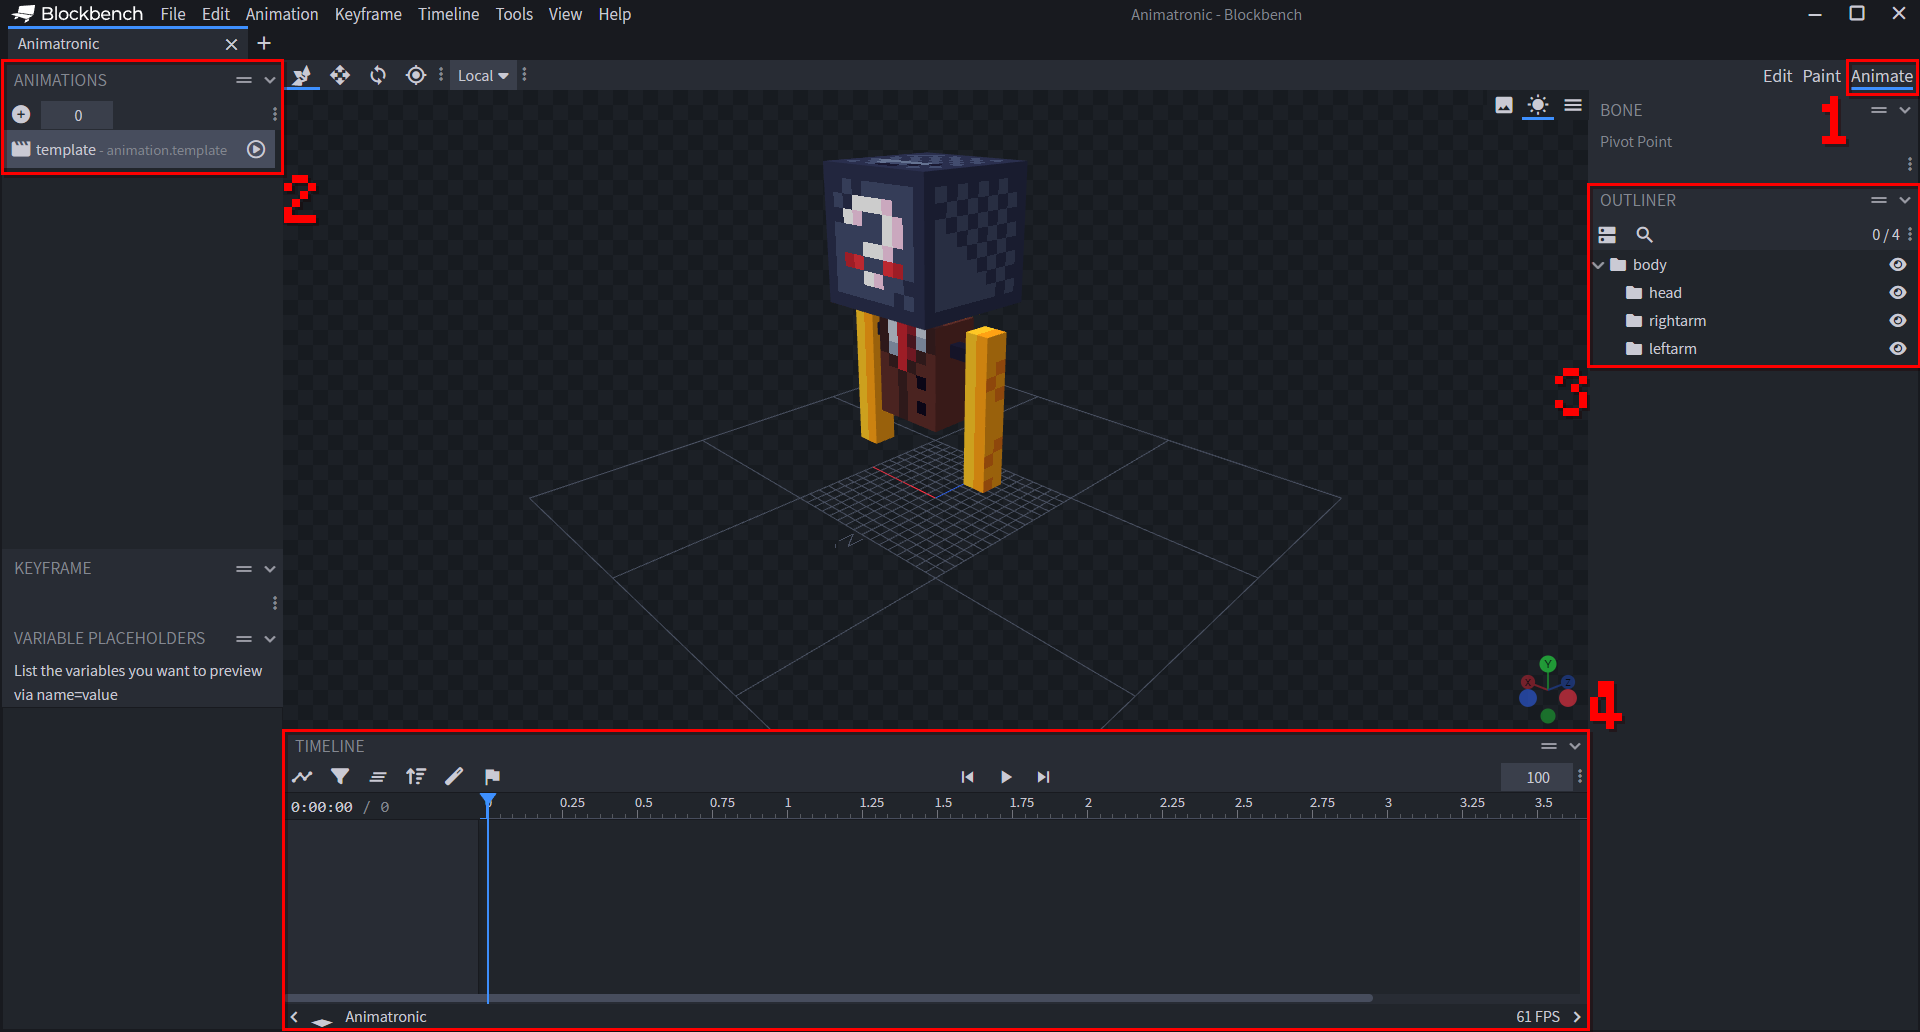
- Open it up and head over to the
Animatesection. - Notice the template animation on the left. You may just use it for now, or delete and create a new one for a better structure, if you want to export the animation later.
- If you want reposition a body part, either click on it in the preview or on the labeled bone.
- Select the rotation tool by clicking on it on the toolbar, or by pressing
[R].
- Select the rotation tool by clicking on it on the toolbar, or by pressing
- Animatronics only can apply one pose at the time. Consider this while animating them! In the timeline, select the frame indicating in which order a position is being pushed. It is recommended to limit the usage to decimal numbers for simplicity later, e.g. 1, 2, 3, ...
Note
For more complex animations, the Lua side part has to be manually implemented as well as there currently is no official provided module! This will be explained in the corresponding section.
Applying rotations
After repositioning the Animatronic however needed, the body part rotations now can be applied in two ways. The lazy way is to copy and paste the the rotation values and push them manually.
The values can be viewed on the lower left corner after selecting the corresponding body part. 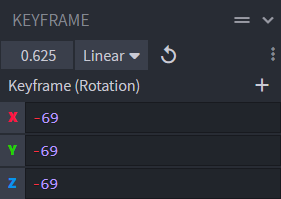
Export Animations
In case for more complex tasks, Blockbench can export animations as json files. This can be very handy for integration in Lua code.
To export the json file, frist go to Animation > Export Animations in the tab section. 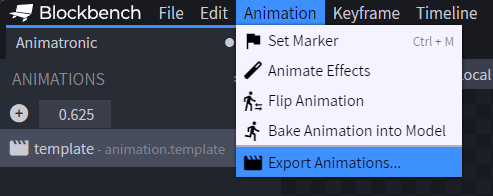
A popup then will open up. Select which animations you want to include in the file (in case multible ones were made). 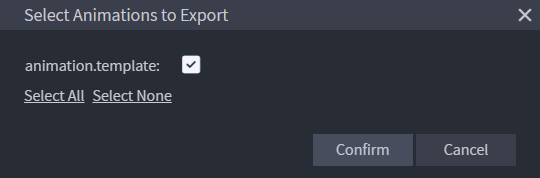
Finally, click on confirm and select where the json file should be saved. For further instructions on how to integrate this in Lua code, head over to the corresponding section.
Lua Animation Parser
Reading the animations from the generated json file is the hardest part of this guide. This section will try it's best to make this process as easy as possible however.
After the file has been uploaded to the Computer, we need to load and parse it before doing anything else with it.
Loading a json file in CC:Tweaked
This code can be used to load a json file. There are more efficient ways to do so, but this one should be solid.
local path = "path/to/your/exported/animations"
local file, err1 = fs.open(path, 'r')

local parsed = {} -- Location for the later parsed animations

if not file then
    -- Error while loading file
    local reason = ("Could not load given file '%s'. Reason: '%s'"):format(path, err1)
    error(reason)
end

-- Reading animations file
local raw = file.readAll()
file.close()

-- Parsing
local result, err2 = textutils.unserialiseJSON(raw)

if not result then
    -- Error while parsing
    local reason = ("Could not parse file '%s'. Reason: '%s'"):format(path, err2)
    error(reason)
end

-- Success
parsed = result
Explanation of json animation files
With this aside, let's focus on the structure of the converted json data. To do so, the following json file will be used as an example:
{
    "format_version": "1.8.0",
    "animations": {
        "animation.template": {
            "animation_length": 1,
            "bones": {
                "head": {
                    "rotation": {
                        "0.0":      [0, 45, 0],
                        "0.0417":   [0, 0, 0],
                        "1.0":      [0, -45, 0]
                    }
                }
            }
        }
    }
}
The structure is pretty self-explanatory. Let's go over some relevant parts anyways:
"animations": object; Contains the animation objects (e.g."animation.template")."animation_length": number; Determines how many frames the animation will run."bones": object; Contains the bones objects that indicate how they change within every configured frame. It may contain an entry for the Animatronics bones:body,head,rightarm&leftarm."rotation": object: Instructions for how the bone will change within frameX.
'Baking' the animations
The format is pretty simple to integrate and use. There is only one problem however. The object "rotation" of each bone object saves the values using a string of the frame number as a key.
This may not be very practical for further code. Especially if keys like "0.0417" were used. In order to simplify the the process in further code, we need to bake the code, i.e., perform a conversion of sorts.
The following code can be used for this:
-- Assuming 'content' contains the parsed animation data
local parsed = { ... } -- Replace with actual parsed data

-- Create a table to hold the baked animations
local animations = {}

-- Loop through each animation entry in parsed data
for name, data in pairs(parsed.animations) do
    local baked = {} -- Create a table to hold the baked animation data for this entry

    -- Loop through each bone in the animation data
    for part, rots in pairs(data.bones) do
        baked[part] = {} -- Create a table to hold the baked bone rotation data

        -- Check if the rotation data is a single set of rotations or a series
        if type(rots.rotation[1]) == "number" then
            baked[part][1] = rots.rotation -- If single, add it as-is
        else
            local indexes = {}

            -- Collect and sort the frame indexes
            for index, rot in pairs(rots.rotation) do
                table.insert(indexes, index)
            end
            table.sort(indexes, function(a, b) return tonumber(a) < tonumber(b) end)

            -- Reorganize the rotation data using the sorted indexes
            for new_index, real_index in ipairs(indexes) do
                baked[part][new_index] = rots.rotation[real_index]
            end
        end
    end

    -- Add the baked animation data to the animations table
    animations[name] = baked
end

-- At this point, the 'animations' table contains the transformed animation data
Consider taking a look at the marked lines for a deeper understanding of the problem solving here!
As a result, this is how the data would look like now:
Our new baked version now is much simpler to handle and contains about the same amount of needed informations as before! It also is easily adjustable.